Suzuki GSX-R Motorcycle Forums Gixxer.com banner

D.I.Y: Fuel pump replacement/upgrade

101K views 19 replies 15 participants last post by  Doubledogdown  
#1 · (Edited)
Suzuki doesn't sell a replacement fuel pump without the whole regulator fuel pump unit at the cost of 500 dollars. That is quite steep in price. I figured out that our fuel pump can be replace by fuel pumps found in 92-00 honda civics or 94-01 acura integras. These pumps cost 100 bucks vs 500 which is a great deal. They are intank pumps just like our bikes pumps.

I upgrade the fuel pump and made how-to guide in the process. Note there is no reason to upgrade the pump unless you are going to turbo/supercharge/n2o or run e85. I upgraded to a walbro 255lph pump for e85.

I am not held liable for injures that might occur, burning your house down or other acts of nature. Use this guide at your own risk and using common sense when handling flammable liquids like gasoline.

Step 1: Remove both retaining bolts to the seat and both tank trims.

Step 2: Remove the front tank hold down bolt and prop the tank.
Image


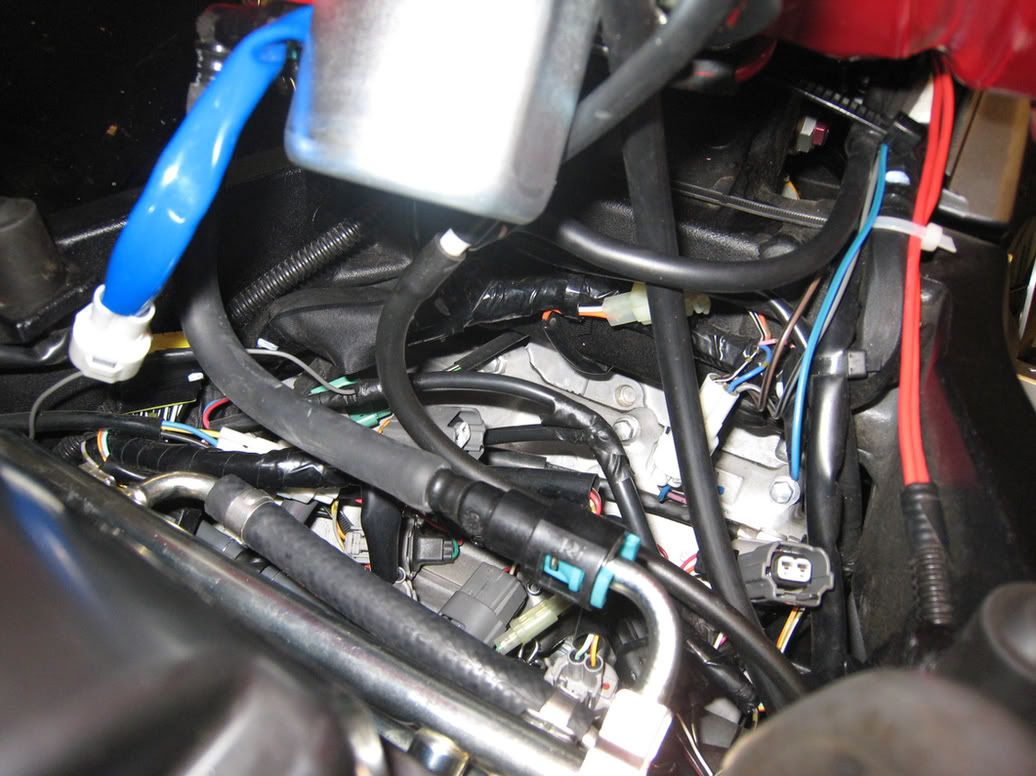
Step 3: Disconnect the fuel line from the fuel rail by pressing in both green tabs and sliding the line off. Next disconnect the fuel pump harness by pressing in the release tab and pull the two connectors apart.
Image


Step 4: Remove the rear fuel tank retaining bolt
Image


Step 5: Set the tank on level ground with something soft protecting the paint.
Image


Step 6: Remove the fuel pump assembly by removing the 5 bolts. Remove the bolts in a crisscross pattern. Even though the bolts are only torque down to 7lbs, because locktie was apply from the factory. They will require a little force to break lose.
Image


Step 7: Slowly lift up the assembly and rotate slowly. Once the pump is remove from the tank, you will notice there is a arm. That is the fuel level arm, tilt the assembly and the arm should come right out.
Image

Image


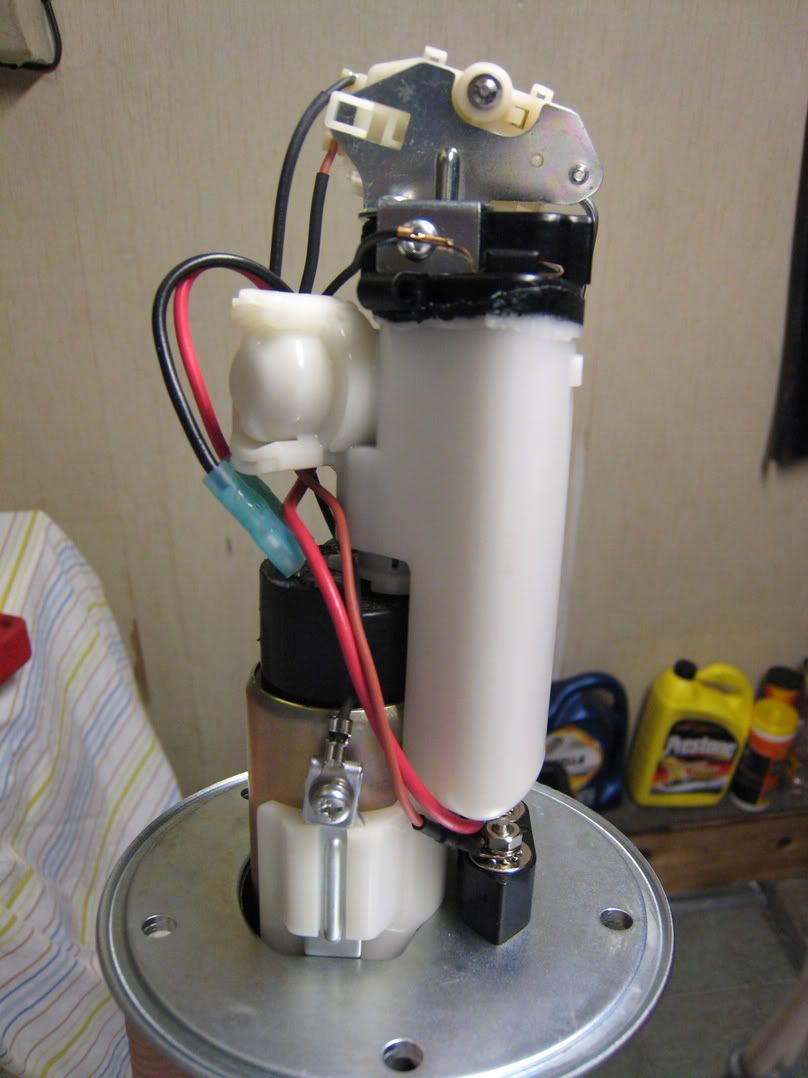
Step 8: Disconnect both grounds(black color wires) on both side of the pump assembly. Disconnect the level sender signal (orange color wire) and fuel pump positive(red color wire).
Image


Step 9: Using a flat head, slowly pry the fuel regulator off the fuel pump. Remove the old pump and remove the fuel strainer with a wiggling motion.
Image


Step 10: The new fuel pump power connector does not clear the fuel pump regulator unit. Using a hack saw, slowly saw it off.
Image
 
#2 · (Edited)
Step 11: Now remove the old fuel pump connector by cutting the connector off. Crimp on new spade connectors onto the fuel pump wires. Positive is red and ground is black. The positive and negative is marked on the fuel pump. Reconnect the fuel pump wires and reassemble the unit. (Gasoline is dielectric, just means it doesn't conduct electricity) Just reverse the instructions for separating the fuel pump from the unit to reassemble.
Image

Image


Step 12: Make sure the unit is assemble correctly. Till the unit until the fuel level arm is 90 degree's point towards the floor. Insert the fuel level arm into the fuel tank first and then slowly wiggly the unit back into the fuel tank.
Image


Step 13: Before bolting the unit back onto the tank, make sure the fuel port is facing the right way.
Image


Step 14: Apply lock-tite to each of fuel pump unit retaining bolts and tighten down to 7lbs in a crisscross pattern. 7lbs is hard to measure so hand tight.
Image

Image


Step 15: Reattached the tank back onto the bike by installing the rear tank retaining bolt first.
Image


Step 16: Reconnect the fuel line back onto the fuel rail. Press the line back onto the fuel rail and make sure the green tabs are lineup with the open space on fuel line connector. Once a click is heard, the line is attached properly. Reconnect the fuel pump harness by pressing both ends back together until a click is heard.
Image


Step 17: Reinstall the battery. Power on the ignition and set the run switch to run to pressurize the fuel system. DO NOT START THE BIKE. Check for leaks and if no leaks are found start the bike. Let the bike run for a few minutes while checking for leaks again. Once no leaks are found, shut off the bike.

Step 18: lower the tank and reinstall the front tank retaining bolt, reinstall the fuel tank trim pieces and reinstall the seat. All done.

Hope this was helpful, happy holidays and ride safe.
 
#20 ·
Step 11: Now remove the old fuel pump connector by cutting the connector off. Crimp on new spade connectors onto the fuel pump wires. Positive is red and ground is black. The positive and negative is marked on the fuel pump. Reconnect the fuel pump wires and reassemble the unit. (Gasoline is dielectric, just means it doesn't conduct electricity) Just reverse the instructions for separating the fuel pump from the unit to reassemble.
Image

Image


Step 12: Make sure the unit is assemble correctly. Till the unit until the fuel level arm is 90 degree's point towards the floor. Insert the fuel level arm into the fuel tank first and then slowly wiggly the unit back into the fuel tank.
Image


Step 13: Before bolting the unit back onto the tank, make sure the fuel port is facing the right way.
Image


Step 14: Apply lock-tite to each of fuel pump unit retaining bolts and tighten down to 7lbs in a crisscross pattern. 7lbs is hard to measure so hand tight.
Image

Image


Step 15: Reattached the tank back onto the bike by installing the rear tank retaining bolt first.
Image


Step 16: Reconnect the fuel line back onto the fuel rail. Press the line back onto the fuel rail and make sure the green tabs are lineup with the open space on fuel line connector. Once a click is heard, the line is attached properly. Reconnect the fuel pump harness by pressing both ends back together until a click is heard.
Image


Step 17: Reinstall the battery. Power on the ignition and set the run switch to run to pressurize the fuel system. DO NOT START THE BIKE. Check for leaks and if no leaks are found start the bike. Let the bike run for a few minutes while checking for leaks again. Once no leaks are found, shut off the bike.

Step 18: lower the tank and reinstall the front tank retaining bolt, reinstall the fuel tank trim pieces and reinstall the seat. All done.

Hope this was helpful, happy holidays and ride safe.
I'm at autozone trying to buy an accura or honda fuel pump and these guys are saying no way ,they are way different....whom ever told you that is high.but they both look high to me. So it really fits rite in other than cutting that one spot?
 
#4 ·
:thumbup

I like it. Finally, someone had a coherent thought when modding the bike.

Before, hurr durr why e85z!!!

E85 will require more changes than just the pump because of its alcohol content, but, the possibility to add compression and timing while using "pump" gas has potential here. Gas mileage will drop, but if tuned for it, the bike could wring out some more power. I like this potential for a track bike.
 
#5 · (Edited)
Well first to address the concern of the alcohol content of e85. Yes, alcohol is corrosive but most cars and motorcycles after 1990 have no issue with running e85. My friend daily drives is 600hp turbo mr2 with no issues. Most manufactures thought of alternative fuels and knew oil was not going to last forever. Plus ethanol has been around since the 90's its just wasn't big like it is now. Our fuel tanks are steel and so are our fuel rails. Our fuel line from tank to fuel rail is harden rubber and it should not have a problem with the alcohol content.

I live by a e85 station 3 blocks away and there are bunch on the way to work. The bike will be setup for flex fuel, which I can run regular gasoline or e85. I pick up a set of rc engineering fuel injectors 410cc for the use of e85. E85 requires 15-30% more fuel then gasoline because its energy output is less. Therefore requiring bigger fuel injectors. The fuel pump is a walbro 255lph which will supply more then enough fuel for what my 600 can make.

One might ask why use e85 as fuel when it is less efficient? The ability to run more ignition timing to make more power and torque. E85 is about 105 octane and premium gas is 91 octane here in CA. E85 cost 2.69 a gallon here while Premium gasoline cost 3.34 a gallon. Alcohol fuels also introduce a nice cooling effect into the combustion chamber. During part throttles I can run leaner afr's which will help with gas mileage. As for my fuel management system, its a secret for now. All in all, I wanted to try something different. It might not be worth to others but for myself it is. I like to go after the impossible and challenge myself.
 
#6 ·
Just wanted to say i have just fitted the Honda Integra pump to the K2 GSXR 1000 and it all fits very well and works great just like described above. Thanks a lot for posting the info and all the pics. Saved a fortune on the new pump. This should be saved as a reference somewhere for others.
 
#13 ·
Firstly, thanks to Jayknight for taking the time to post this in such detail - very useful!

The information is relevant for a range of different modern bikes - I can confirm that even BMW R1200GS's use a similar Bosch unit. So to echo Jayknight's advice - exercise due care, remove your pump as described and get to the bronze pump bit ... which will have a model number / manufacturer on it. Source a new replacement from a car auto store and viola! $400 saved :)
 
#16 ·
Jayknight, it's a handy thread man. i'm about to build a pump for my bike, just gotta get the some crimp connectors. i'm gonna try flag connectors so i don't have to bend the prongs on the Walbro and i'm thinking they should clear the housing. the only information i would add is the Walbro model#. i heard it was GSS342, so that's the one i got. maybe you can confirm that.