Suzuki GSX-R Motorcycle Forums Gixxer.com banner
1 - 20 of 79 Posts

gmcgixxer

· Premium Member
Joined
·
205 Posts
Discussion starter · #1 ·
I bought my gixxer from the original owner in 1991 with 7k miles on it. In my youthful exuberance I made the usual period-popular mods. Hindle exhaust, 36mm mikunis, corbin seat, shaved turn signals, sprocket change, and a really bad driveway frame polish.

I rode it and drag raced it a lot. And then in 2007 I went down and it slid into the back of a car. I was pretty disgusted with the damage and just decided to put it in the garage and deal with it over the winter, which then turned into 18 years. LOL.

I decided its time to put her back together.

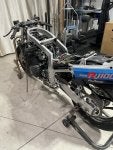
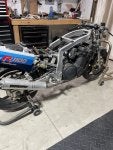
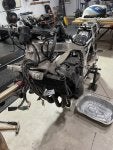
Tonight I got off the trashed bird cage, the snapped steering damper, a few panels, and the gas tank.

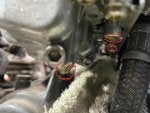
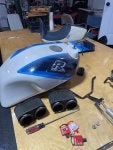
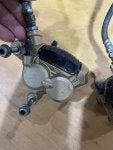
And this leads to my question. Ive pulled the tank over the years Ive owned it plenty of times. This time, when I removed the tank gas started leaking out of the carbs and I couldnt determine the source. Can anyone give me some insight as to where it may be coming from. The leaking has stopped now (I'm guessing the bowls emptied). Ive attached a pics of the where I am seeing the gas drip from, but I know its not source of the leak. Ive also attached a few of the bike.

I will make my best effort to keep updating this thread as I make progress on the putting this beaut back together and getting it back on the road.

Best regards,
Robby
 

Attachments

Discussion starter · #3 ·
Welcome to the forum.
The Corbin "Gun Fighter" is a nice touch.
It will be worth the effort. I've got an '86 1100 as well.

My guess is the float needle & seat are stuck, allowing gas to overflow.
The carbs need to be cleaned and inspected.
Roger on the float and needle. After 18 years of sitting the carbs are coming off to get disassembled and cleaned, for sure. I was surprised gas started leaking out of them though. Thanks for the input!
 
I am not familiar with 1st gens, but if the fuel petcock is vacuum operated like the 2nd gens, you may need to rebuild the petcock. If vacuum operated and if the petcock was not in the prime position, no fuel should flow to the carbs until the engine is running.

You also need to smell your engine oil for gasoline. You should be replacing it anyway, but don't even think about starting it up with gas in the oil.
 
Discussion starter · #6 ·
I am not familiar with 1st gens, but if the fuel petcock is vacuum operated like the 2nd gens, you may need to rebuild the petcock. If vacuum operated and if the petcock was not in the prime position, no fuel should flow to the carbs until the engine is running.

You also need to smell your engine oil for gasoline. You should be replacing it anyway, but don't even think about starting it up with gas in the oil.
100%, thanks for the reminder about the potential for gas to be in the oil. Yes, it is a vacuum triggered petcock.
 
one mod i did to my 86 model, i plated the underneath of the fuel tank ( cut holes in the arched inner first) it made a huge difference to the flickability dur to lowering the cog, it requires not running stock airbox, but looks like your not now , so you have nothing to lose, added bonus is approx 25l capacity as well
 
Discussion starter · #8 ·
one mod i did to my 86 model, i plated the underneath of the fuel tank ( cut holes in the arched inner first) it made a huge difference to the flickability dur to lowering the cog, it requires not running stock airbox, but looks like your not now , so you have nothing to lose, added bonus is approx 25l capacity as well
That's correct, I am not currently running the stock air box. Thats a great idea to add capacity to the tank without changing its outward appearance.
 
Discussion starter · #9 ·
I am going to try using Krud Kutter to clean all the bits and pieces. I had forgotten just how well preserved the bike was when I mothballed it. The paint on the calipers (and on most other painted pieces) is pretty darn good. I don't want to respray. I think a good deep cleaning / degreasing will get this thing looking good again. Anyone have an suggestions on good cleaners or is Krud Kudder the way to go?
 

Attachments

Discussion starter · #12 ·
Use an ultra sonic cleaner. I use simple green with one with great results. Might as well rebuild it with new seals while you’re there.
Good to go on the simple green. Thanks for the tip. Ill do a search and read up on ultra sonic cleaners. Yes, i am rebuilding them both, the rear, front and rear masters, and the clutch master.
 
Discussion starter · #13 ·
While I have the forks and the rear shock out, I'm going to have them rebuilt. Does anyone have a good shop, knowledgeable about our old bikes, that you'd recommend taking them too? I live in Western New York, just outside of Buffalo.
 

Attachments

Discussion starter · #14 ·
yes, the 86 1100 is worth the effort to restore. it will be good for the bike and good for you.

i agree, do not respray. keep it original. original paint is better than a re-spray, even a good re-spray.

please keep us updated.
yes sir I agree. Happy to get her back on the road.
 
Discussion starter · #17 ·
Discussion starter · #18 · (Edited)
Beairsto Racing and Builder 45, thanks for the suggestions. I spoke with Racetech today and for just a basic rebuild of the rear shock and front forks I'm looking at $750 (not including shipping and tax). And that is if they do'nt need any additional work. Im going to rebuild them myself. Really they are in great shape. And the bike has been stored properly for 19 years. Im sure some elbow grease and a rebuild kit will give me what I need.

I started cleaning up the front end with some krud cutter. Im going to try simple green, too. What a difference a good deep cleaning is making!
 

Attachments

Make sure you use genuine Suzuki seals, wipers, bushings etc. Everything else is junk. Racetech's parts are excellent too, not sure if they are Suzuki or not.

You will need some specialized tools too, that is if you want a high quality rebuild and you don't want to pull your hair out in the process. Racetech sells fork tools.

After you purchase the parts, tools, and fluids, In the end you'll save some money, but is all the time, effort, and learning worth it to you? The rebuild parts I estimate will be $150 to 200, for a straight rebuild without any trick parts. The tools will be a few hundred as well if you do it right.
 
1 - 20 of 79 Posts